A Step-by-Step Guide to DIY Raised Garden Beds
INTRODUCTION
Raised garden beds offer gardening enthusiasts a versatile and manageable solution for cultivating plants, particularly in urban or limited-space environments. With their many benefits, from enhanced soil drainage to superior soil quality, raised beds provide an ideal canvas for nurturing a thriving garden. The elevated structure not only facilitates easier access for planting, weeding, and harvesting but also offers a customizable layout tailored to individual preferences and plant needs.
Whether you're a seasoned gardener looking to optimize your growing space or a novice eager to embark on a rewarding gardening journey, building your own raised beds is a fulfilling endeavor. In this comprehensive guide, we'll walk you through each step of the process, helping you to craft a personalized garden right in your backyard.
MATERIALS
- Wood: Cedar or untreated lumber is preferred for its durability and resistance to rot. You'll need boards of appropriate length and width for your desired bed size.
- Galvanized Screws or Nails
- Hammer
- Screwdriver
- Level
- Tape measure
- Saw
- Drill
STEP-BY-STEP
Step 1: Choose a Location
Select a suitable location for your raised bed. Ensure it receives adequate sunlight for the types of plants you plan to grow and that it's accessible for watering and maintenance.
Step 2: Determine Bed Size
Measure and mark the dimensions of your raised bed. Consider factors like available space, ease of access, and the types of plants you intend to grow. Common sizes range from 4x4 feet to 4x8 feet, but you can customize the dimensions to suit your needs.
Step 3: Cut the Boards
Using a saw, cut the wooden boards to the desired lengths for the sides of your raised bed. If you're using multiple boards per side, ensure they're evenly sized.
Step 4: Assemble the Bed
Arrange the cut boards in a rectangle or square shape to form the sides of the raised bed. Use a level to ensure the corners are square and the bed is level. Secure the boards together at the corners using galvanized screws or nails, drilling pilot holes to prevent splitting.
Step 5: Install the Bed
Place the assembled raised bed in its designated location. If the ground is uneven, you may need to level it before placing the bed. Ensure the bed is stable and doesn't wobble.
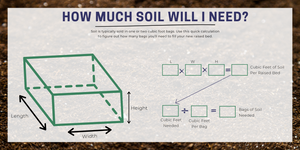
Step 6: Fill the Bed with Soil
Fill the raised bed with a high-quality soil mix suitable for the types of plants you'll be growing. Consider adding compost or other organic matter to enrich the soil and improve fertility.
Step 7: Plant Your Garden
Once the raised bed is filled with soil, it's ready to plant. Choose your favorite vegetables, herbs, flowers, or other plants and arrange them according to your desired layout. Remember to water and care for your garden regularly to ensure healthy growth.

MAINTENANCE TIPS
Maintaining your raised garden bed ensures its long-term health and productivity. Here are some essential tips to keep your garden thriving:
Soil Moisture Management: Regularly monitor the moisture levels of your soil, especially during periods of hot and dry weather. Adjust your watering schedule accordingly to ensure that your plants receive adequate hydration. A moisture meter or simply sticking your finger into the soil can help you gauge when it's time to water.
Mulching: Apply a layer of organic mulch, such as straw, wood chips, or shredded leaves, to the surface of the soil in your raised bed. Mulch helps retain moisture, regulate soil temperature, and suppress weed growth. It also adds organic matter to the soil as it breaks down, enriching its fertility over time.
Rotation: Rotate your plants annually to promote soil health and minimize the risk of pests and diseases. This practice involves changing the types of plants grown in each area of your raised bed from one growing season to the next. Rotating prevents soil depletion, reduce pest and disease pressure, and improve soil structure. Follow a simple rotation plan by grouping plants by family and rotating them through different areas of your raised bed each year.
Structural Integrity Checks: Periodically inspect the structural integrity of your raised bed to ensure it remains sturdy and secure. Check for signs of wear, such as warping, rot, or loose screws, and make any necessary repairs promptly. Reinforce corners or replace damaged boards as needed to maintain the stability of the bed. Regular maintenance will prolong the lifespan of your raised bed and provide a stable foundation for your garden.
By implementing these maintenance tips, you can nurture a flourishing raised bed garden season after season. Stay proactive in caring for your garden, and enjoy the rewards of your efforts as you watch your plants thrive and flourish.
CONCLUSION
Crafting your own raised garden bed is a fulfilling endeavor that empowers you to create a personalized area of greenery and abundance right in your backyard. By following this comprehensive guide and implementing the provided tips, you can build a sturdy and productive raised bed that enhances your gardening experience. Whether you're a seasoned gardener seeking to optimize your growing space or a novice embarking on a new hobby, the rewards of cultivating your own garden are endless.
We invite you to share your progress and accomplishments with us. Send us pictures of your finished raised bed garden—we'd love to see how your project turns out!